
How to Patch Concrete (Step‑by‑Step Guide)
As an Amazon Associate, I earn from qualifying purchases.
Concrete patching is the best way to fix low spots, chips, and damaged areas so your slab stays solid and ready for resurfacing or regular use. With the right patching mix and a few basic tools, you can rebuild worn concrete and create a strong, long‑lasting repair.
Related Guides
- How to Repair Concrete Cracks – Step‑by‑step guide for cleaning, prepping, and filling cracks the right way.
- Concrete Repair Hub – For all repair methods, tools, and step‑by‑step tutorials
- How to Resurface Concrete – Ideal for restoring worn, spalled, or ugly concrete with a fresh, uniform finish.
- Start Here: Concrete Tools & Guides – Your main resource hub for tools, materials, and techniques used in every repair project.
- Best Concrete Patch Products (Contractor‑Tested Picks)
Why Patch Concrete
Patching concrete restores strength to damaged areas, stops deterioration from getting worse, and creates a solid base for resurfacing or regular use.
Problems Patching Concrete Can Fix
Fixes low spots and uneven areas
Repairs chips, small holes, and surface damage
Stops deterioration from spreading
Creates a solid base for resurfacing
Improves appearance and extends slab life
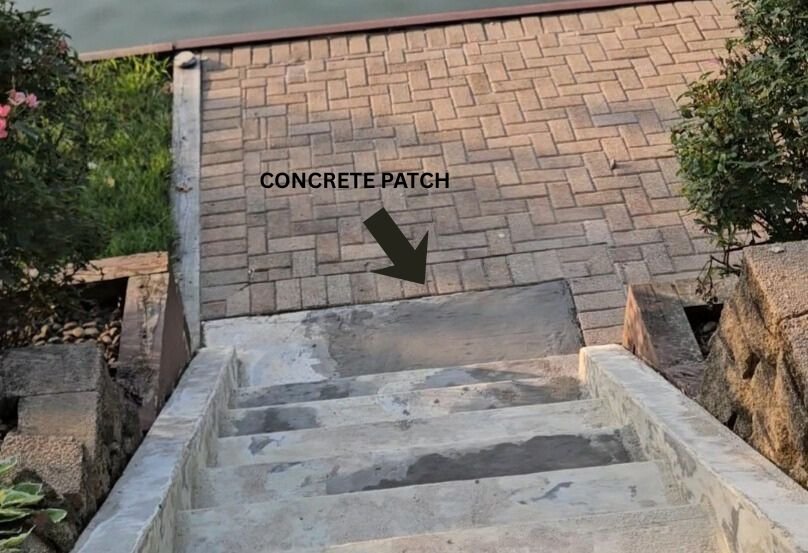
Holes where Patched with Ardex Concrete Patch
Tools You’ll Need for Concrete Patching
Patching damaged concrete is straightforward when you have the right tools. Proper preparation and quality materials ensure the patch bonds well and lasts under traffic and weather.
Wire Brush – To clean out loose debris and rough edges in the damaged area.
Shop Vacuum or Leaf Blower – Ensures the patch area is free of dust and particles.
Concrete Patching Compound – Choose based on the size of the repair:
Ardex Concrete Patch — high-strength, ideal for deep holes and high-traffic areas.
DAP Premixed Concrete Patch — convenient for small repairs and easy for homeowners.
- Ardex CD– if your going to resurface(concrete dressing) afterwards
Mixing Bucket & Drill – For even mixing of powdered compounds.
Trowel or Putty Knife – To fill and smooth the patch for a clean finish.
Protective Gloves – Protect your hands during prep and application.
Sponge or Float – Optional, for final smoothing and blending edges.
Having the right tools makes patching easier and more effective. Clean the area thoroughly, choose the proper patching compound, Resurfacer, and apply carefully — will result will be a durable repair that blends with the existing concrete.
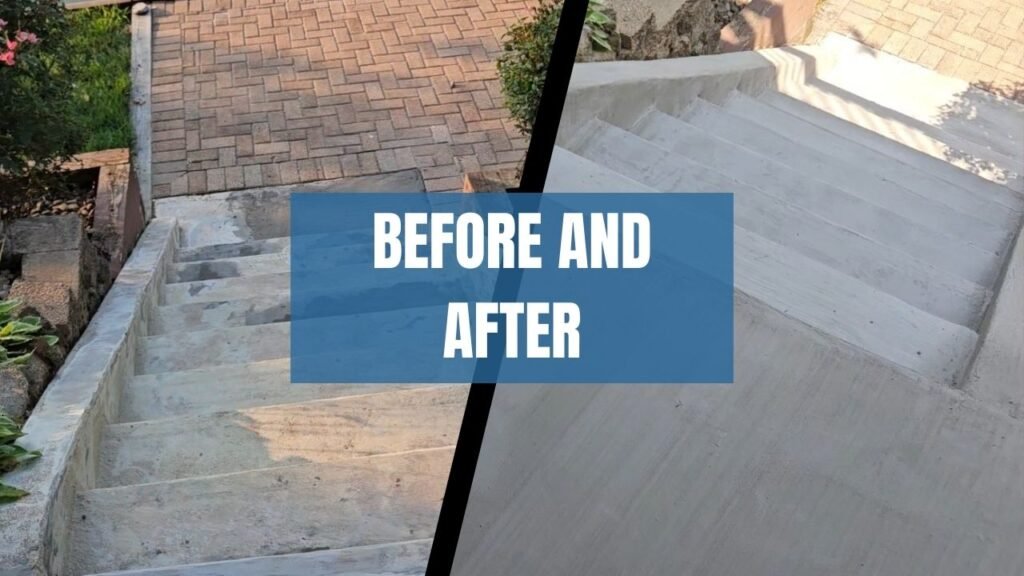
resurfaced with Ardex CD. This product bonds incredibly well and brings old concrete back to life.
Step‑by‑Step Guide: How to Patch Concrete
1. Clean the damaged area Brush away dirt, loose concrete, and debris so the patch bonds properly.
2. Chip out weak or crumbling concrete Remove anything soft or unstable until you reach solid material.
3. Rinse and remove dust Vacuum or rinse the area to clear out fine dust that can weaken the bond.
4. Apply bonding adhesive (if required) Some patching mixes need a bonding agent—follow the product instructions.
5. Mix your concrete patch Blend the patching compound to a thick, workable consistency.
6. Fill the damaged area Press the patch into the repair with a trowel, packing it tight with no air pockets.
7. Shape and smooth the surface Feather the edges so the patch blends into the surrounding concrete.
8. Let it cure Allow the patch to set according to the product directions before walking or resurfacing.
Final Thoughts on Patching Concrete
Patching concrete is one of the simplest ways to restore strength to a worn slab and stop small problems from turning into bigger, more expensive repairs. By filling low spots, chips, and damaged areas, you stabilize the surface and prevent moisture from getting underneath, which is what causes most long‑term deterioration. With the right patching mix and a few basic tools, you can rebuild weak sections, blend them into the surrounding concrete, and create a solid base for resurfacing or everyday use. Done correctly, a good patch not only extends the life of your slab but also sets the stage for a clean, uniform finish if you choose to resurface later.
Ready to Finish the Job?
Once your patches are solid, the best way to bring the whole slab back to life is with a fresh concrete resurfacer. It gives you a clean, uniform finish that hides old repairs and makes the entire surface look new again. Check out my step‑by‑step resurfacing guide to see exactly how to do it the right way.