
Epoxy Concrete Coatings
As an Amazon Associate, I earn from qualifying purchases.
Epoxy floor coatings are one of the toughest and longest‑lasting options for indoor concrete. They create a hard, seamless surface that resists chemicals, stains, and wear, making them ideal for garages, basements, workshops, and utility rooms. With the right prep and application, epoxy transforms a plain concrete slab into a durable, easy‑to‑clean floor that holds up for years.
Related Guides
Sealers & Coatings Hub – Overview of all sealer types and where to use them
Outdoor Concrete Sealer – Best options for driveways, patios, and exterior slabs
Indoor Concrete Sealers – protect basement and interior floors from moisture, dusting, and everyday wear.
- Start Here: Concrete Tools & Guides – Your main resource hub for every project
- Best Epoxy Floor Kits – DIY friendly kits with all the bells and whistles you man need
Types of Epoxy Coatings
100% Solids Epoxy The thickest and most durable type. Creates a hard, chemical‑resistant floor used in garages, shops, and industrial spaces. BP Resins is great with multiple colors to choose from
Water‑Based Epoxy Easier to apply, low odor, and great for basements or indoor spaces. Not as thick as 100% solids but still strong.
Solvent‑Based Epoxy Strong and durable with good penetration, but higher fumes. More common in commercial settings.
Metallic Epoxy A decorative epoxy with metallic pigments that create a marbled, 3D look. Popular for basements, showrooms, and high‑end interiors. Spartan Epoxies’ metallic floor kits are some of the most visually stunning decorative systems
Epoxy Flake/Chip Systems Epoxy base coat with vinyl flakes broadcast into it, then top‑coated. Great for garages—hides imperfections and adds texture. Check out Best Epoxy Floor Kits for DIY friendly options
Types of Polyurethane Coatings
Aliphatic Polyurethane UV‑stable, scratch‑resistant, and flexible. Commonly used as a topcoat over epoxy to protect against yellowing and wear. Urethane coatings are highly recommended as a topcoat
Aromatic Polyurethane Strong but not UV‑stable. Better for indoor use where sunlight isn’t an issue.
Water‑Based Polyurethane Low odor, fast‑drying, and great for indoor floors. Adds a clear, durable finish without darkening the concrete.
High‑Build Polyurethane Thicker, more protective version used in commercial or industrial settings where abrasion resistance is critical.
Why Epoxy and Polyurethane Coatings
Epoxy and polyurethane coatings aren’t just tough—they’re the closest thing concrete has to artwork. These systems turn a plain slab into a smooth, glossy, designer surface that looks custom‑built and built‑to‑last. Whether it’s a metallic swirl, a clean high‑build finish, or a flake floor that hides every flaw, these coatings deliver the strongest protection you can put on indoor concrete while giving the space a modern, visually stunning look. It’s durability and design in one package—part performance, part art form.
Tools and Products You’ll Need
Surface Prep
Concrete grinder or etching solution
Diamond cup wheel (for edges and repairs)
Shop vac with fine‑dust or HEPA filter
Degreaser and stiff scrub brush
Crack and patch repair material
I use a DEWALT surface grinder with a vacuum attachment to etch and profile the concrete, giving the epoxy a clean, dust‑free surface to bond to.
Application Tools
Epoxy squeegee (notched)
18″ roller frame and epoxy‑safe roller covers
Chip brushes for edges
Mixing buckets and drill mixer paddle
Spike shoes for walking on wet epoxy
Coating Materials
Concrete primer (optional but recommended)
Epoxy base coat (Part A + Part B)
Vinyl flakes/chips (if using a flake system)
Polyurethane or epoxy clear topcoat
A complete flake-floor kit that includes the epoxy base coat, vinyl flakes, and clear topcoat — everything you need for a durable, slip-resistant garage or basement floor.
Shop the Ultra Coat Flake Flooring Kit on Amazon
A premium metallic epoxy system designed for deep, fluid, high-gloss floors that look custom-poured. Each kit includes the resin, hardener, metallic pigments, and clear topcoat, giving you a visually stunning, showroom-quality finish. Ideal for garages, basements, or any indoor concrete slab where you want a durable, professional look.
Shop the Spartan Epoxies Metallic Kit on Amazon
Safety Gear
NIOSH‑approved respirator
Nitrile gloves
Safety glasses
Disposable coveralls
Step‑by‑step guide to epoxy and polyurethane floor coatings
Inspect and test the concrete Look for cracks, spalling, oil spots, paint, or old coatings. Check for moisture issues (white powder, dark damp spots, or past peeling coatings). If the slab is damp or has hydrostatic pressure, note that for your moisture‑tolerant primer section.
Clean and degrease the slab Remove everything loose or greasy—dust, dirt, oil, tire marks, and old sealers. Use a concrete degreaser on oil spots and scrub until water no longer beads on the surface. Rinse and let the slab dry completely.
Mechanically profile the surface The floor needs “tooth” for epoxy to bite into. Grind, shot blast, or at minimum etch the surface so it feels like 80‑grit sandpaper. Vacuum thoroughly with a good shop vac so there’s no dust left to interfere with adhesion.
Repair cracks and damaged areas Fill cracks, pits, and spalled areas with an appropriate repair material (epoxy repair mortar or fast‑setting patch). Feather repairs smooth so they don’t telegraph through the coating. Let repairs cure as directed.
Apply the primer coat (if used) Roll on a compatible concrete primer to improve adhesion and help lock down any remaining dust. Follow coverage rates and avoid puddling. Let it dry within the manufacturer’s recoat window.
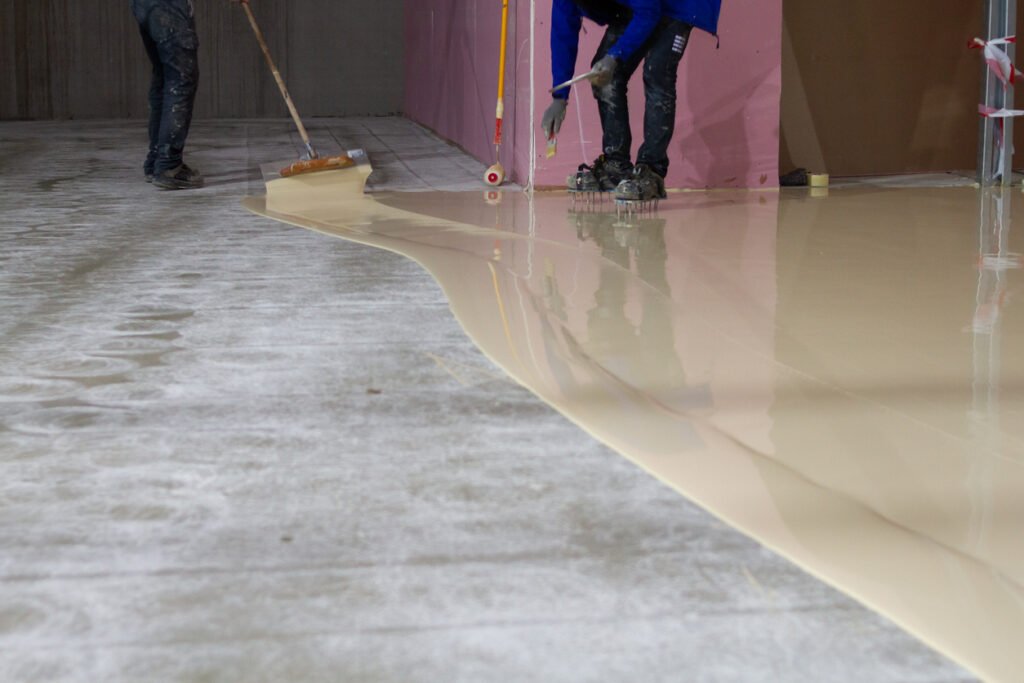
Mix the epoxy base coat Combine Part A and Part B exactly as the instructions say—no eyeballing. Mix thoroughly, respecting induction time if required. Only mix what you can place within the working time (pot life).
Apply the epoxy base coat Cut in edges with a brush, then roll the epoxy in sections using a squeegee and roller. Aim for an even, consistent film at the recommended mil thickness. Work out of a wet edge so you don’t get lap lines.
Broadcast flakes (if using a flake/chip system) While the base coat is still wet, broadcast flakes by hand. For full broadcast, throw until the floor won’t take any more and looks completely covered. Let the epoxy cure fully.
Scrape and vacuum the flakes After curing, scrape the floor in multiple directions to knock down high flakes and create a flat surface. Vacuum thoroughly to remove all loose chips and dust.
Apply the clear polyurethane (or epoxy) topcoat Mix the topcoat per instructions. Roll it out evenly over the floor, sealing in the flakes and building your final wear layer. For non‑flake floors, this clear coat adds gloss, chemical resistance, and scratch resistance over the epoxy.
Let the coating cure before use Respect cure times. Light foot traffic usually after 24 hours, heavier use after 48–72 hours, and vehicle traffic only when the manufacturer says it’s ready. Rushing this step is how hot‑tire pickup and early damage happen.
Maintain the floor Sweep or vacuum grit regularly and mop with a neutral cleaner. Avoid harsh acids or strong solvents. With basic care, a good epoxy + polyurethane system will stay glossy, clean, and protected for years.
Common Mistakes & Pro Tips
1. Skipping proper surface prep Most coating failures start here. Smooth concrete, dust, or old sealers will stop epoxy from bonding. Pro Tip: Grind or etch until the slab feels like 80‑grit sandpaper, then vacuum twice.
2. Ignoring moisture issues Epoxy hates moisture. If the slab is damp, it can bubble, peel, or fisheye. Pro Tip: Tape down a plastic sheet overnight. If moisture collects underneath, use a moisture‑tolerant primer.
3. Mixing too much epoxy at once Epoxy heats up fast in the bucket and can harden before you get it on the floor. Pro Tip: Mix smaller batches and pour the epoxy out of the bucket immediately to extend working time.
4. Not applying a thick enough base coat Thin coats lead to bald spots, uneven color, and poor flake coverage. Pro Tip: Follow the recommended mil thickness and use a notched squeegee to keep it consistent.
5. Uneven flake broadcasting Throwing flakes too close to the floor creates clumps and bare patches. Pro Tip: Toss flakes upward like you’re feeding chickens—this gives a smooth, even spread.
6. Forgetting to scrape the flakes Un‑scraped flakes leave sharp edges and a rough, sandpaper feel. Pro Tip: After curing, scrape in multiple directions before vacuuming.
7. Skipping the urethane topcoat Epoxy alone scratches easily and can yellow over time. Pro Tip: Always finish with a polyurethane topcoat for UV stability, abrasion resistance, and long‑term durability.
8. Rushing the cure time Walking or driving on the floor too early ruins the finish. Pro Tip: Respect the manufacturer’s cure window—foot traffic after 24 hours, vehicles only when fully cured.
Final Thoughts on Epoxy Flooring
Epoxy flooring is one of the most impressive upgrades you can make to indoor concrete—durable, glossy, customizable, and built to last. Doing it yourself can save thousands, sometimes even tens of thousands, compared to hiring a professional. But it’s still a serious project that requires the right prep, the right materials, and the right technique. When applied correctly, an epoxy and polyurethane system delivers a floor that looks incredible and performs even better. Take your time, follow each step carefully, and you’ll end up with a finish that feels like a professional installation at a fraction of the cost.