
How to Repair Concrete Cracks : Step-by-Step Guide
As an Amazon Associate, I earn from qualifying purchases.
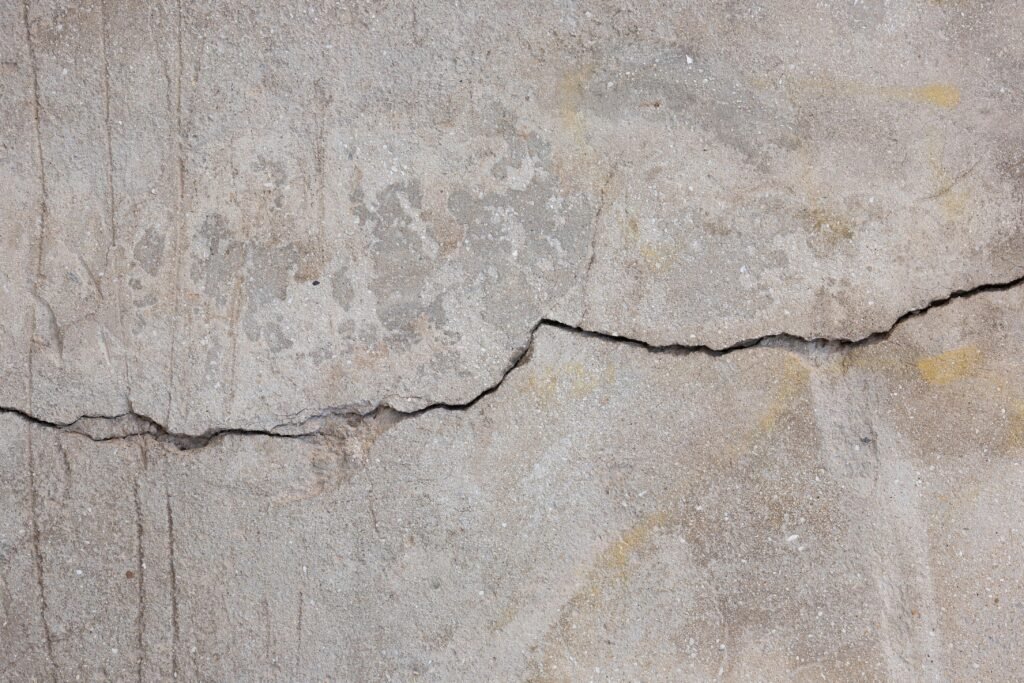
Concrete cracks are common, but fixing them early keeps water out, prevents bigger damage, and helps your slab last longer. If you need help choosing a filler, see my Best Concrete Crack Fillers page.
Related Guides
- Concrete Repair Hub – For all repair methods, tools, and step‑by‑step tutorials
- How to Patch Concrete – Best for fixing holes, pits, and damaged areas so your slab is solid and ready for sealing or coating.
- How to Resurface Concrete – Ideal for restoring worn, spalled, or ugly concrete with a fresh, uniform finish.
- Start Here: Concrete Tools & Guides – Your main resource hub for tools, materials, and techniques used in every repair project.
- Best Concrete Crack Fillers (2026 Buyer’s Guide
Why Repair Concrete Cracks
Repairing concrete cracks isn’t just about looks—it protects your slab from bigger problems down the road. Even small cracks let water in, and once moisture gets below the surface, freeze‑thaw cycles, soil movement, and erosion can turn a simple hairline crack into a major repair. Fixing cracks early keeps the slab stable, prevents trip hazards, stops water from reaching your foundation or garage, and helps your concrete last years longer. A quick repair now can save you from costly resurfacing or full replacement later.
Problems Repairing Cracks Can Fix
Stops water from getting under the slab
Prevents freeze‑thaw damage
Keeps small cracks from spreading
Reduces soil erosion under the concrete
Prevents the slab from shifting or sinking
Eliminates trip hazards
Keeps moisture away from garages and foundations
Helps prevent insects and ants from nesting inside cracks
Tools You’ll Need for Concrete Crack Repair
Repairing cracks in concrete starts with having the right tools. Using quality materials and proper prep ensures your repairs last longer and look professional.
Wire Brush – Clears debris and dust from cracks for a clean surface.
Shop Vacuum or Leaf Blower – Ensures cracks are completely clean and dry before applying filler.
Concrete Crack Filler – The right filler makes all the difference:
DAP Concrete Crack Filler Powder — easy to mix and ideal for small to medium cracks.
Autosel Concrete Crack Filler — self-leveling and quick-drying, perfect for driveways and sidewalks.
- Ardex Concrete Patch– Concrete patch works just as good and no point buying crack filler if you need patch anyways.
- If your slab needs more than crack repair, a resurfacer like ARDEX CD can bring old concrete back to life — see my Best Concrete Resurfacers page.
Mixing Bucket & Drill – For even mixing of powdered fillers.
Putty Knife or Trowel – To spread and smooth filler into cracks.
Protective Gloves – Keep your hands safe from chemicals.
Caulk Gun – Optional, for controlled application of tube fillers.
resurfaced with Ardex CD. This product bonds incredibly well and brings old concrete back to life.
Step‑by‑Step Concrete Crack Repair
Inspect the crack Take a close look at the crack to make sure the concrete around it is still solid. If the slab is crumbling or moving, that’s a bigger structural issue—simple crack filler won’t fix that. See my Best Concrete Patch page
Open up tight cracks (if needed) For hairline or very tight cracks, use a hammer and chisel to slightly widen the crack into a “V” or “U” shape. This gives the crack filler something to grab onto instead of just sitting on the surface.
Clean out the crack Use a wire brush or stiff scrub brush to remove loose concrete, dirt, and debris from inside the crack. Then sweep or vacuum the area so the crack is as clean as possible.
Remove dust and moisture Run a shop vac over the crack to pull out fine dust. Make sure the crack is dry before you start—most crack fillers don’t bond well to wet concrete unless the label specifically says they do.
Apply bonding adhesive (optional) For deeper or wider cracks, you can brush a concrete bonding adhesive into the crack according to the product directions. This helps the repair material lock into the old concrete.
Load or mix your crack filler If you’re using a tube‑style crack filler, cut the tip to the right size and load it into a caulking gun. If you’re using a pourable or mix‑type filler, mix it in a small bucket following the instructions on the bag or bottle.
Fill the crack Slowly apply the crack filler into the crack, starting at one end and working your way to the other. Make sure the material gets all the way down into the crack instead of just sitting on top.
Tool the surface smooth Use a putty knife or margin trowel to level the filler with the surrounding concrete. Feather the edges so it blends in and doesn’t leave a raised ridge.
Add more in layers if it settles Some fillers will sink slightly as they cure, especially in deeper cracks. If that happens, come back and add a second light layer to bring it flush with the surface.
Let it cure Follow the cure time on the product label before driving or walking heavily on the repair. Rushing this step can cause the filler to crack or pull away.
Decide on sealing or resurfacing Once the cracks are repaired and cured, you can leave them as‑is, seal the slab, or resurface the entire area for a uniform finish — see my Best Concrete Resurfacers guide or the full How to Resurface Concrete tutorial.
Final Thoughts on Concrete Repair
Concrete repair is one of the easiest ways to protect your slab and keep small problems from turning into expensive ones. Fixing cracks early stops water from getting underneath, prevents shifting and erosion, and helps your concrete last years longer. With the right tools and a little prep work, most repairs are quick, affordable, and well within DIY range. Take your time, follow the steps, and you’ll end up with a cleaner, safer, and longer‑lasting surface. If you want help with other repairs like patching or resurfacing, visit the Concrete Repair Hub to see all guides in one place.
Next Step: Patch Any Low or Damaged Areas
Once your cracks are repaired, the next smart move is patching any low spots, chips, or worn areas so the slab is fully solid again. This gives you a stronger, longer‑lasting surface and sets you up perfectly if you plan to resurface later. Check out my step‑by‑step guide on how to patch concrete to finish the job the right way.